Concrete floors are known for their durability, but over time, even the toughest surfaces can show signs of wear and tear. Cracks, spalling, and pitting are some of the most common issues that affect concrete floors, whether in garages, basements, or outdoor spaces. These problems not only impact the appearance of your floor but can also lead to more serious structural concerns if left untreated. That’s why timely repair is essential to maintain the integrity and safety of your concrete surfaces. Whether you’re a confident DIYer or considering professional help, learning how to repair concrete floor damage can save you money and prevent further deterioration. In this guide, we’ll walk you through everything you need to know to tackle concrete floor repairs effectively and efficiently.
Tools and Materials Needed
- Concrete patching compound or filler
- Trowel or putty knife
- Wire brush or grinder
- Safety gear (gloves, mask, goggles)
- Concrete resurfacer
- Sealant
- Bonding agent
Common Types of Concrete Floor Damage
Before diving into the repair process, it’s important to identify the type of damage your concrete floor has. Understanding the issue will help you choose the right repair method and materials. Hairline cracks are thin, surface-level fractures that often appear due to shrinkage or temperature changes. While they may seem minor, they can worsen over time if not sealed properly. Deep cracks, on the other hand, penetrate further into the slab and may indicate structural issues or foundation movement. Another common problem is spalling, where the surface of the concrete flakes or chips away, often due to freeze-thaw cycles or poor finishing techniques. Pitting or holes appear as small craters or divots on the surface, usually caused by corrosion or wear and tear. Finally, settling or uneven floors can result from soil movement beneath the slab, leading to dangerous tripping hazards and more serious structural concerns. For more detailed guides, check out our related posts on how to fix cracked concrete floors or concrete resurfacing tips.
Step-by-Step Guide: How to Repair Concrete Floor
If you’re wondering how to fix cracks in concrete floor or handle surface damage on your own, this DIY concrete repair step-by-step guide will walk you through the process.
Step 1: Inspect and Identify the Damage
Start by assessing the type and severity of the damage. Are the cracks superficial or deep? Is there crumbling or unevenness? Minor cracks can usually be fixed at home, but if you notice wide gaps, major settling, or structural shifts, it might be best to consult a professional.
Step 2: Clean the Area Thoroughly
A clean surface is crucial for a successful repair. Remove all debris, dust, oil, or loose concrete using a wire brush, vacuum, or even a pressure washer for deeper cleaning. This helps the repair materials bond properly.
Step 3: Prepare the Surface
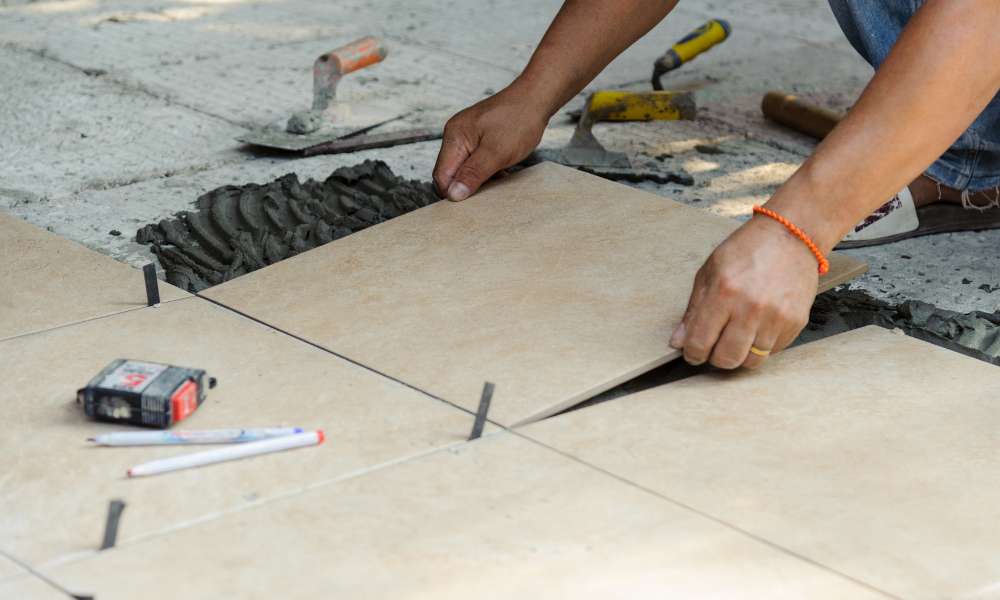
If needed, apply a bonding agent to help the repair compound adhere better. Then, fill cracks or holes with a high-quality concrete patching compound. Smooth it out with a putty knife or trowel.
Step 4: Apply Concrete Repair Compound
Using a trowel, spread the compound evenly over the damaged area. Work it into the crack or hole and smooth out the surface. This is key to achieving a level, professional-looking finish.
Step 5: Let It Cure
Allow the repaired area to dry and cure fully according to the product instructions—typically 24 to 48 hours. Avoid stepping on or placing heavy objects on the repair during this time.
Step 6: (Optional) Resurface or Seal the Floor
For extensive wear or cosmetic improvements, you may want to resurface the entire concrete floor. Applying a concrete sealer afterward adds protection against moisture, stains, and wear, extending the life of your repairs.
Tips for Long-Lasting Repairs
Once you’ve fixed your concrete floor, proper maintenance will keep it intact for years to come. First, always attempt to keep your concrete floor dry, as moisture is one of the primary culprits of cracking and deterioration. If your floor is located in a basement or garage, think about a dehumidifier, or proper drains. Second, every few years you need to apply a quality concrete sealant. Sealing helps to protect the surface from moisture, chemicals, and abrasions, extending its life considerably. Finally, be careful of how you use the space — don’t drag heavy things or drop sharp tools; these actions cause chips or create new cracks. With a little care, your DIY concrete floor repair can stay strong, smooth, and safe for the long haul.
When to Call a Professional
Although it is possible to rectify many minor concrete floor problems by yourself, there are occasions when it is best to enlist the help of a professional. Structural issues, such as large and deep cracks that keep returning, or widespread damage across your slab, are best evaluated by an expert. Widespread damage, or floors that have sunk too low, usually the result of soil erosion or foundation issues, generally need special tools and skills to fix correctly. If you’ve tried fixing it yourself and see the DIY solutions not consistently work, or the damage continues to worsen, that should tell you more than one thing is likely going on. A pro contractor can identify the root of the problems in your floor, remedy them with permanent solutions, and protect the integrity of your flooring.
Read more: How to Repair Concrete Block Wall
Conclusion
Repairing a damaged concrete floor might seem intimidating at first, but with the right tools and a clear plan, it’s a project many homeowners can tackle on their own. To recap, the key steps in how to repair concrete floor include identifying the type of damage, cleaning and prepping the area, applying a suitable repair compound, allowing proper curing time, and optionally sealing the surface for added protection. Regular maintenance—like keeping the area dry and resealing every few years—can go a long way in preventing future issues. If you found this guide helpful, feel free to share it, leave any questions in the comments, or consult a professional if your floor shows signs of serious structural damage. Taking care of your concrete floor now means fewer headaches and expenses later on.